


Mastering Timelapse Photography: A Step-by-Step Guide to Capturing Time's Hidden Drama
Timelapse photography is a captivating technique that allows you to capture the subtle drama of the world unfolding.


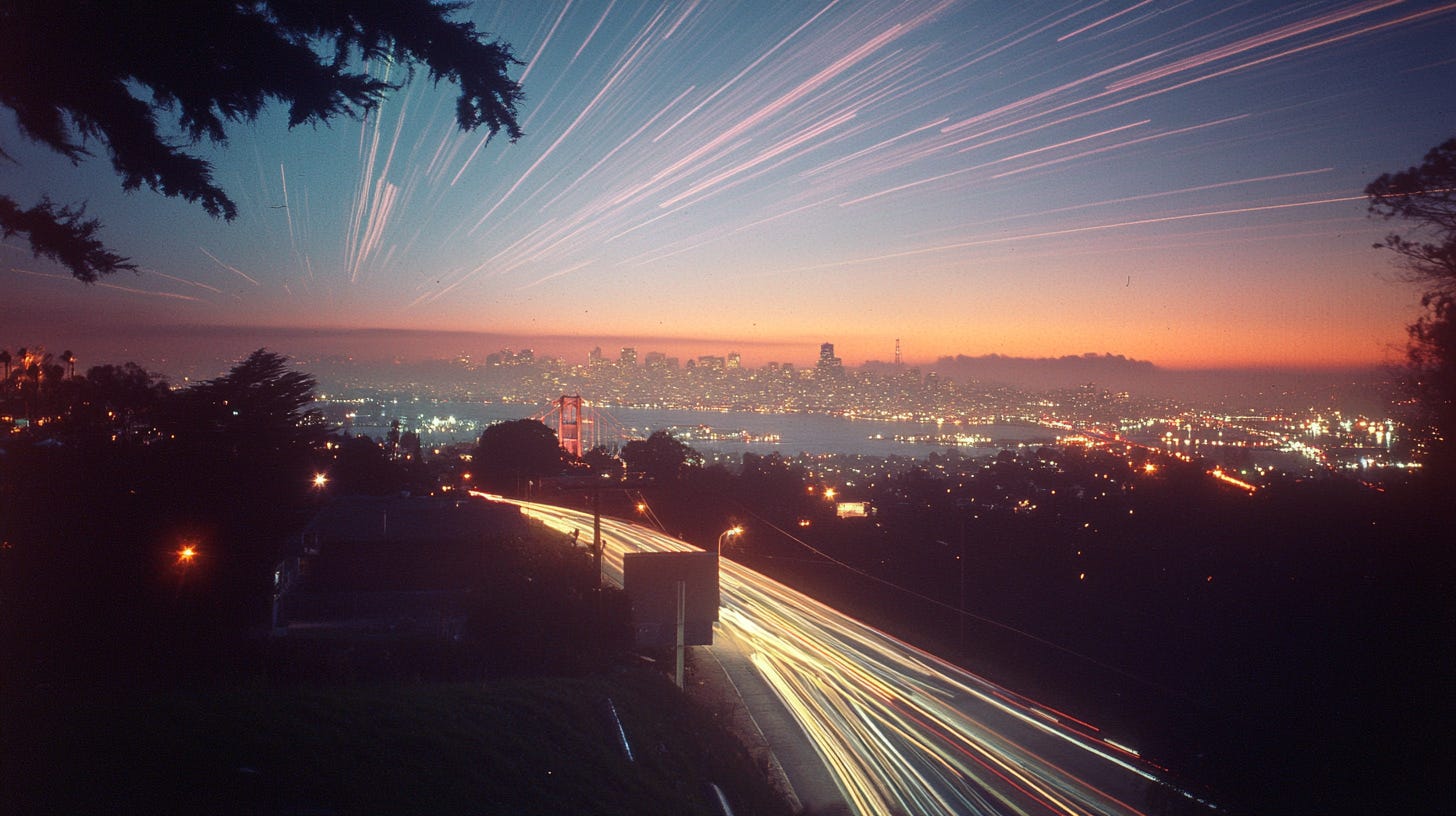
By capturing a sequence of photos at set intervals and combining them, you can create stunning videos that compress hours into seconds, revealing the mesmerizing dance of clouds, crowds, and changing light. But timelapse isn't just limited to videos; you can also create striking still images that blend the passage of time into a single frame, like the ethereal streaks of stars in a startrail photo. Typically these are technically called “long exposure” images, or possibly the resulting image is created by stackign and combining multiple images together. I’ll use these interchangeably - and you’ll notice that I’ve embedded videos from my YouTube channel where I’ve created timelapse videos by combinining images taken with an interval timer, but the still images featured in this post represent long exposure images capturing movement over time (interestingly, all of these images are AI generated, where I used prompts to generate this style of image as examples). Whether you're a seasoned photographer or just starting out, timelapse offers a unique way to expand your creative vision and capture the magic of time.
Mastering Timelapse Photography: A Step-by-Step Guide
Quick Start Guide:
Choose a subject: Anything that changes over time can be a great timelapse subject!
Set up your camera: Use a tripod and intervalometer or your camera's built-in interval timer.
Choose the right interval: The interval will depend on how fast your subject is moving.
Shoot in manual mode: This will help you avoid flickering and ensure consistent exposure.
Post-process your images: Use software like Lightroom or LRTimelapse to create your final timelapse video.

Introduction: The Magic of Timelapse Photography
Imagine watching a sunset melt into starlight in 15 seconds, or a bustling city square transform from dawn to dusk in a hypnotic blur. Timelapse photography isn’t just a technique—it’s a superpower. By compressing hours into seconds, it reveals the invisible rhythms of our world: clouds swirling like paint, shadows crawling across landscapes, and crowds moving like schools of fish. Whether you’re documenting nature’s grandeur or human activity, timelapses turn the mundane into the extraordinary. Ready to unlock this magic? Let’s dive in.
Part 1: Setting Up Your Timelapse (Camera-Specific Guides)
Canon EOS R: Quick Setup for Stunning Results
Switch to Video Mode: Set your dial to video, then select manual mode for full control.
Navigate the Menu: Go to the red camera icon → “Time-lapse movie” (Hint: Disable Digital IS and Canon Log first—these block the feature!).
Fine-Tune Your Settings:
Resolution: 4K for crisp detail, HD for smaller files.
Interval: Start with 2-5 seconds for fast action (cars), 30+ seconds for slow scenes (clouds).
Shots: Need a 15-second clip? At 24fps, that’s 360 frames. Calculate: (Desired seconds × Frame rate) = Total shots.
Exposure: Use auto for simplicity, or manual for consistency in changing light.
Memory Card: Use a high-speed card with enough capacity for your desired shots.
Fujifilm (X-S10/X-H2s): Harness the Interval Timer
Find the Tool: Head to the Shooting Menu → Interval Timer Shooting.
Customize Your Shoot:
Interval: Match your subject’s speed—1 second for traffic, 1 minute for drifting fog.
Number of Shots: Set a finite number (e.g., 300) or “∞” to manually stop.
Start Time: Delay the start for golden hour or night skies.
Pro Tip: Pair with Fuji’s film simulations (like Velvia) for in-camera color drama.
Part 2: The 4 Pillars of Perfect Timelapses
Interval Secrets:
Slow subjects (clouds, stars): 30 seconds to 1 minute.
Fast subjects (people, cars): 1-5 seconds.
Test it: Shoot a 10-frame trial to gauge motion smoothness.
Shot Math Made Simple:
For Instagram? 15 seconds × 30fps = 450 shots.
Shooting for “infinity”? Use a large memory card and external battery.
Exposure Mastery:
Auto ISO: Great for beginners, but risky in flickering light.
Manual Mode: Essential for sunsets—lock settings to avoid jarring brightness shifts.
Example Settings: For city sunsets, start at f/8, ISO 100, 1/60s and adjust as light fades.
Gear Non-Negotiables:
Tripod: Even a gust of wind can ruin hours of work.
ND Filters: Use these to slow shutter speeds (e.g., 1-second exposure for light trails in daylight).
Stabilization: Consider sandbags for added stability in windy conditions.
Part 3: From Raw Frames to Cinematic Gold (Post-Processing)
Sequencing:
Import shots into Lightroom or LRTimelapse, apply edits to one frame, and sync across all.
Editing Software:
Premiere Pro: Drag images into a timeline, set duration to 1 frame per shot.
Final Cut Pro: Use the “Automatic Speed” tool for seamless playback.
Pro Polish:
Add music, adjust speed ramps, or mask out flicker with plugins like GBDeflicker.
Common Post-Processing Issues:
Flicker: Use anti-flicker plugins (like GBDeflicker or similar plugins) to remove flicker caused by inconsistent lighting.
Jerky motion: Adjust the frame rate or use a plugin like ReelSteady to smooth out motion.
Part 4: Creative Sparks to Elevate Your Timelapses
Composition Tricks:
Leading Lines: Frame moving elements (rivers, cars) to lead the eye.
Scale: Use foreground objects (trees, buildings) to show scale.
Shutter Speed Alchemy:
1/50s: Sharp details for cityscapes.
2+ seconds: Dreamy motion blur in waterfalls or star trails.
Storytelling Moments:
Contrast: Capture contrast: A lone figure in a speeding crowd.
Transitions: Shoot transitions: Day-to-night using manual exposure adjustments.

Part 5: Real-World Examples
Beach Timelapse: In my beach timelapse, the sun rises over the horizon shifting beautiful gradients across the sky while silohuettes from palm trees sliced through the scene —all in 20 seconds. The key? A 10-second interval and patience.
Cityscape Timelapse: Capture the hustle and bustle of city life with a timelapse of a busy intersection. Use a 1-2 second interval to capture the movement of cars and people.
Star Trail Timelapse: Create a mesmerizing timelapse of the stars moving across the night sky. Use a long exposure (20-30 seconds) and a 30-60 second interval to capture the stars as streaks of light.
Part 6: Your Turn—Go Break Time
Timelapses thrive on experimentation. Try a 24-hour shoot of your backyard, or a 5-minute rush-hour sequence. Share your wins (and bloopers!) in the comments—I’d love to feature your work.
Ready to Level Up?
Subscribe to More with Wes Photo for deep dives on ND filters, night timelapses, and pro editing hacks. Let’s turn time into art, one frame at a time.
Call to Action:
Share your timelapse with #TimelapseMagic!
What’s your dream timelapse subject? 🌟